Showing posts with label tutorial. Show all posts

Monday, April 7, 2014

DIY: Easter Gift Bags

I made these cute DIY Easter Gift Bags for Evermine recently and wanted to share them here as well. I used Tulip brand fabric markers to decorate muslin bags with Easter doodles. This is a super fun and easy craft you can do with your kids or at your next craft club!

See full tutorial at: Evermine Blog


Thursday, July 19, 2012

DIY Summer Flower Crown

You may recognize this pretty flower crown from the Summer Style post I did yesterday. It's been quite a while since I shared a DIY here. I made this fun flower crown 'just because' (it's summer!) last weekend and it turned out so pretty I just knew I had to share it with you all. I used a tutorial by Bleubird Vintage as my guide. Feel free to check out her blog too! See my instructions below.
What You Need:
• Fake Flowers (I got mine at the Dollar Store)
• Floral wire
• Fabric covered floral wire
• Floral Tape
• Plyers
The first step is to make a circle using the fabric covered floral wire that fits comfortably on your head. The fabric wire I used came in precut lengths, so I wound three pieces together to create a circle large enough for my head (this also helped to create a sturdy base for my crown).
Next I chose my first flower. Cutting a small piece of floral wire (about 4 inches), I wrapped the flower tightly around circle base with pliers (please excuse my chipped fingernails!).
Continue to cut and wrap more and more flowers onto the circle, layering them nicely, until you have wrapped them all the way around the circle.
Try it on and take a look in the mirror! Check for any gaps in the crown that may need to be filled in with more flowers. Once finished, wrap floral tape around the entire base of the crown (this helps cover the wire ends and keeps them from getting tangled in your hair). Just be careful as you wrap around that you don't squish or break any of the flowers.
And it's done! This was a fun, simple project perfect for a summer afternoon craft. I'll warn you, if you decide to go out wearing your flower crown (like I did) you will receive lots of squeelly compliments from little girls AND be asked if it's your birthday (I just smiled and said, "No! I'm just celebrating summer!")

Peace & Happy Summer!
Rachel

PS.
All Tie-Dye Raceback Tanks in my shop will be ON SALE starting tomorrow, July 20th! Enter the coupon code: HURRAY4SUMMER and receive 30% off any tank top!

Monday, February 13, 2012

DIY Love Beads

Ever since I painted my Janis Joplin portrait, I've wanted to do this DIY. No one wore hippie love beads quite like she did. A traditional hippie accessory, Love Beads are long, handmade strings of beads worn by both guys and girls in the 1960's. The trend is thought to have evolved from the generation's fascination to non-Western cultures such as India and Native America. 

What You Need:
• Beading Wire
• Flat-nose Jewelry Plyers
• Crimp Beads
• Jump Ring, Connector Charm, or Clasp
• Lots of Beads!
I made two strands of Love Beads for this project- One I strung beads in a fun pattern and another I used random multicolor beads together. I like the way both turned out. 
To make a strand of Love Beads, I first like to organize my beads in teacups or small bowls. This way I grab the ones I need easily and organize my colors. All the beads you see here I bought second hand.

Here are my tips for finding and collecting beads:
Thrift stores & garage sales- When thrifting I always look for clothes that have beads on them that I can easily cut off and use for jewelry projects. Some thrift stores also have craft supply sections where you can find bags of random beads. If you live in Portland, my favorite place to go is the Knittin' Kitten, a craft supply thrift store on NE Glisan.
Friends & family- Ask around! You never know who might have a box of beads sitting in their closet leftover from their beading phase 10 years ago. 
• Broken/old jewelry- Whenever a necklace or earring breaks or falls apart, I always save the remnants to recreate into something new!

To get started, first cut your beading wire to length. I wanted my necklaces to be super long (just like Janis Joplin), so I cut mine 54 inches long, leaving a few extra inches for tying off the finished strand. 

Next I started stringing on beads. If you want to make a pattern, I like to start in the middle of the necklace and use both ends of the string to add beads in my desired pattern. This method is dangerous though! The more beads you string on, the heavier the necklace gets, and the easier it is to drop your ends and lose your beads!

Creating the random multicolor bead pattern is a bit easier as you can tie off one end of your string. I recommend using tape because it's easy to take off when you're ready to finish your ends and it won't kink or untie itself (which is what happens when you try to tie a knot in beading wire). 

Once you've completed our strand of beads, it's time to finish the ends. I used two crimp beads (which you can find at any craft or bead store) and a small heart connector bead. Crimp beads are small metal cylinders that hold a doubled cord securely when you flatten or crimp them with pliers. You can use anything you like to connect your ends together. Since my necklace was so long, I didn't need to use a clasp. You could also use a simple jump ring if you don't have any connector beads on hand. 
Finishing your Love Beads:
• After you've finished stringing your necklace, place a single crimp bead on the end of the strand and a clasp, connector, or jump ring.
• Slip the wire tail back through the crimp bead and then through the next several beads. Tug the wire so it's taut, with no gaps between beads or at the end.
• Firmly crimp the bead closed using flat-nose pliers. Clip off the end of the wire close to the beads so the end tucks back in and won't scratch your skin.

Wear your love beads with your favorite hippie/retro outfit or give them away to friends!

For your listening enjoyment, Love Beads and Meditation by The Lemon Pipers


Thank you to Lindsay Jewell for her amazing photography skillz. This book has everything you need to know about making jewelry.

Wednesday, February 1, 2012

Sweetheart Cupcakes + Free Printables!

February is here and that means Valentine's Day is right around the corner! My favorite things about Valentine's Day are the color pink, candy, hearts and showing my friends and family how much I love them. This year I decided to whip up these pretty Sweetheart Cupcakes!

They turned out so cute I knew I had to share the recipe along with some fun free printables I made just for the occasion. You can download them here and make your own cupcake toppers!


Sweetheart Cupcakes
Recipe adapted from Cheese and Chocolate
Makes 18-21 cupcakes
• White cake batter (If using a store bought mix, follow the directions on the box to make your batter. I used this recipe for Lemon Buttermilk cake batter)
• Red food coloring
• Vanilla or other white or pink frosting (I used buttercream frosting)
• Red and pink sprinkles (optional)

Preheat oven to 350 degrees (or as instructed on the box). Line 2 muffin tins with about 20 cupcake liners.
Prepare your cake batter per your chosen recipe’s instructions. Fill each cupcake liner about 1/3 full with white batter. Then set aside. Add a few drops of red food coloring to the remaining batter (I added in about 3 drops to make a light pink color). Pour 1/3 of the pink batter into a pastry or ziploc bag and set aside.
Add more red food coloring drops to the remainder of the pink batter until you get a nice dark pink or red color. Pour the red batter into another pastry or ziploc bag.
Cut the tip of the red bag batter off and stick the open tip into the middle of each cup of white batter. Squeeze a few tablespoons of the red batter into each cup. Repeat this process with the pink batter- cut the tip of the bag off and stick the tip into the middle of the red batter, squeezing in a few tablespoons of batter into each cup.


Bake cupcakes for about 20-25 minutes or until a toothpick inserted in the middle comes out clean. Transfer the cupcakes to cooling racks and let cool completely.
Next make your frosting. If you want to make your own, use your favorite recipe for vanilla or buttercream frosting. If you’re like me and lost steam after making all the cupcakes, you can use a store bought jar. Add in a few drops of red food coloring to make your frosting pretty n’ pink. Frost each cupcake and top with red and pink sprinkles.
For extra cuteness, download these free printables and make your own toppers! Cut out each heart and attach them to wooden skewers or toothpicks (I used small pieces of tape). Poke them into the top of each cupcake and you're done!


Friday, October 7, 2011

DIY Candy-Filled Pumpkin Tutorial!

Happy Friday everyone! I recently created this fun tutorial for the My Own Ideas blog and thought it was so cute, I'd share it on my own blog as well! Enjoy!


I originally got the idea from Martha Stewart’s Cherry Bomb Wedding Favor How-To. But instead of a cherry, I decided to make pumpkins for Halloween favors. Martha’s how-to says these are “a cinch to make” but it took a little practice for me to get the hang of it. After making 4 duds, I came up with these beauties!
Tools & Supplies:
• Orange tissue paper
• Scissors
• Candy (I used Reese’s Pieces)
• Covered floral wire
• Floral Tape
Directions:
1. Stack two layers of tissue paper. Using a small plate (6-8 inches in diameter is a good size), trace a circle. Cut out, cutting through both layers.

2. Place about 30 pieces of candy (fewer depending on the size of candy you use) in the center of the circle.
3. Gather the edges of the tissue up over the candy and twist together at the middle to create the stem of your pumpkin. You’ll want your ’stem’ to be about 3/4″-1″ long. Set aside.

4. Cut a piece of covered wire about 6″ long and bend one end at a 90 degree angle that is the same length as your tissue stem.


5. Wrap the long end of the wire around a pen or pencil to create the pumpkin’s twisty vine.

6. Place the straight end of your wire at the base of your tissue stem with the twist pointing downwards (toward the ‘pumpkin’). Using floral tape, wrap tightly around the wire and all the way up the tissue stem. If you want you can add a small piece of tape at the very top of the stem (to cover the top). Keep wrapping the tape around the stem until it is completely covered (remember floral tape isn’t like normal tape. It only sticks to itself, so wrap tightly and be sure to overlap it to ensure it holds together well).
(I added a small diamond gift tag from myownlabels.com to make it more personalized, but that is totally optional!)

PS. For anyone interested in personalized labels and tags, we are hosting a giveaway on the My Own Ideas blog for a $50 gift certificate from myownlabels.com!

Thursday, April 14, 2011

Crafty Tutorial: How to make a Sit-Upon

Some of you may remember me mentioning I was working on a camp-theme craft tutorial for Artsy Chaos' Camping and Nature Art Event. Well I finished it last weekend and it's up on their blog now!

In case you were wondering what a Sit-upon is exactly, I can tell you making one is a Girl Scout tradition and an essential tool in camping and other outdoor activities. A sit-upon is a homemade waterproof cushion. They are super easy to make and great to have whenever you find yourself needing to sit on the bare ground.

CLICK HERE to see my full tutorial!


Thursday, February 3, 2011

Paper Heart Note-Fold Tutorial ♥


Do you remember passing notes in class when you were young? I remember in high school my friends and I were constantly writing notes back and forth to each other. My favorite part was being passed a note that was folded into something cool. I saved shoeboxes full of passed-notes until I went to college, when I finally threw them out.

Nowadays, people send more text messages than hand-written messages. But I think notes are still fun to exchange with friends! When I was trying to remember the different ways I folded notes in high school, I had the idea of creating a little tutorial to share. And since Valentine's Day is coming up, the heart-shaped note-fold is perfect!

Step One: Write a Valentine's Day message on regular notebook paper.
Step Two: Fold the right corner of the paper down to make a triangle shape (photo 1). Unfold and do the same with the left corner (photo 2).
Step Three: Next, your going to fold a water bomb base on the upper section of the paper (photo3).
Step Four: Fold the right point up the the top and do the same with the left point, creating a diamond (photo 4).
Step Five: Take the right edge of the paper and fold it horizontally to the center, lining it up with the diamond (photo 5). Repeat with the left edge (photo 6).
Step Six: Next fold the bottom up to meet the lower point of the diamond (photo 7). 
Flip over.
Step Seven: Fold the top point of the diamond down, folding the diamond in half 
(photo 8).
Step Eight: Take the bottom left corner and fold it to the middle, lining it up with the lower point of the diamond (photo 9). Repeat with the right side (photo 10). 
Step Nine: Tuck the corners from the last step into the pocket you made in step 7 (photo 11).
Step Ten: Next fold the right point of the diamond diagonally down (photo 12). Do the same with the left point (photo 13).
Step Eleven: Then tuck the points into the flap made in step 7 (photo 14).
Turn it over and you have your heart shape! Don't forget to write a "to:" and "from:" and then pass it to your sweetheart on Valentine's Day ♥

Friday, January 21, 2011

Chinese Paper Lantern DIY

Hi there! I just wanted to let you all know I've recently created a great DIY tutorial on how to make Chinese Paper Lanterns over on the My Own Ideas blog. This is a great rainy day project to make for the Chinese New Year (which is on February 3rd this year)!

Happy Friday and have a great weekend!

♥ Rachel

Tuesday, September 21, 2010

Craft Tutorial: God's Eye Birthday Bouquet!

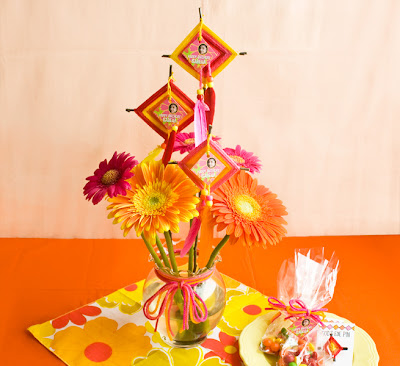
I'm excited to share with you my latest craft tutorial - how to make this pretty God's Eye Bouquet. God's eyes are one of my favorite craft projects to make and in my tutorial I'll show you how to create them as a colorful centerpiece - Perfect for any special occasion!

My God's Eye Pins and simple candy bags are perfect party favors!

CLICK HERE to see the full tutorial, over at the My Own Ideas Blog.

Wednesday, July 28, 2010

Craft Tutorial: Feather Party Favor


Check out my latest crafty tutorial over at the My Own Ideas Blog. ♥

Sunday, May 23, 2010

My Own Ideas Blog

Hope you all are enjoying your weekend. I just wanted to let you know about a new blog I am contributing to. It's called My Own Ideas and is published by a local Portland company called, My Own Labels. They've just posted a fun tutorial I created on how to make some cute garland for decorating your home for a special occasion. Definitely check out their website, I will be contributing craft tutorials monthly!

Wednesday, March 17, 2010

Crafty Thursday: DIY Daisy Headband

Since spring is almost here (the vernal equinox is this Saturday!), I thought I'd share with you a little tutorial on how to make this sweet Daisy Headband.

CLICK HERE for the full tutorial.

Wednesday, March 10, 2010

Crafty Thursday: DIY Shamrock Rainbow Brooch

Time for my second DIY project! If you missed the first, check out how to make a Bread & Butterfly here. This week's craft project is a Shamrock Rainbow Brooch. St. Patrick's Day is next week! Don't get pinched ;)

Click Here for the full tutorial. If you have any questions, or decide to make one too, email me! I'd love to see what yours turns out like!

Wednesday, March 3, 2010

DIY Bread & Butterfly

Observe the Bread-and-Butterfly....

(source)
It's wings are thin slices of bread-and-butter, it's body a crust, and it's head is a lump of sugar. What does it live on you ask? Why, weak tea with cream in it of course!

Like I mentioned yesterday, I have a Wonderland inspired craft to share in honor of Tim Burton's movie coming to theaters this Friday. I decided to make up my own little tutorial on how to make a felt Bread & Butterfly.


Click Here to see the full tutorial and download the template.

This is the first (of hopefully many) craft tutorials I plan to post here on the Camp Smartypants blog. So let me know what you think! And if you have any questions or comments, be sure to contact me. I'd love to see your results if you decide to make one too :)

Saturday, October 31, 2009

Halloween Costume - Part 4

The last thing I had to do today to complete my costume was to make my lion's tail. I chose to use a sample piece of upholstery fabric I found at SCRAP and more fringy scraps (the same as the mane) for the end of the tail.

First I cut the upholstery into a long strip, about 4" wide and gathered my fringy scraps together.

Next I placed my fringy scraps onto the right side of the upholstery fabric with the ends meeting together.

Then I folded over the upholstery and pinned it together at the edge. I made sure that the fringe was on the inside so that when I turned it inside out, they would be visible at the end of the tail.

Sew sew sew along the edge. I left a 1/2" seam allowance. Also sew over the end where the fringe is to secure it.

The last step was to turn it inside out (so that now the right side + fringe are on the outside) and add a little stuffing to give it some extra shape.


Costume complete! Now its time for makeup, and putting everything together!
See the entire process of this costume:
Part 1
Part 2
Part 3
Related Posts with Thumbnails